The Ultimate Guide to the Tripod for BBQ: Elevating Your Grilling Game to New Heights
Imagine the perfect barbecue scene: smoky aromas filling the air, the satisfying sizzle of meat over glowing coals, and a gathering of friends. Now, envision taking that classic two-dimensional grilling experience and adding a literal new dimension—height and motion. This is the transformative power of the tripod for BBQ. Far from being just a stand for a cauldron, the modern BBQ tripod is a versatile, dynamic cooking system that elevates your culinary capabilities, offering unmatched control, safety, and theatrical flair. This comprehensive guide will explore the profound benefits of integrating a tripod into your barbecue repertoire, detailing how to choose, set up, and master this ancient tool for modern feasts. We’ll also uncover how its synergy with heavy-duty cast iron from https://chinacastiron.com/ unlocks a world of slow-cooked, flame-kissed possibilities that a stationary grill simply cannot achieve.
Why a Tripod? The Philosophy of Elevated Cooking
The tripod for BBQ represents a paradigm shift from static cooking to interactive, controlled culinary artistry. Its core advantages are foundational:
Unparalleled Heat Control: This is the tripod’s superpower. By simply raising or lowering the cooking vessel via a chain or adjustable hook, you have immediate, precise control over temperature. Lower it into the coals for a furious sear or rolling boil; raise it high for a gentle, all-day simmer. This direct manipulation of distance replaces fiddling with vents and baffles.
Superior Safety and Stability: A sturdy tripod provides a rock-solid, three-point foundation on any terrain, even uneven ground. It secures heavy pots and Dutch ovens over open flames, eliminating the risk of a tipped-over pot of scalding liquid or hot coals—a critical safety feature, especially in group or family settings.
Optimal Airflow and Fire Management: Elevating the fire off the ground and suspending the cookware above it allows for excellent 360-degree airflow. This results in a cleaner-burning, hotter fire with less smoke, as oxygen can freely feed the flames from all sides.
Expanded Culinary Versatility: The tripod is not a grill replacement; it’s a grill multiplier. While your grill grates handle steaks and burgers, the tripod can simultaneously suspend a Dutch oven for baked beans, a stockpot for corn on the cob, or a kettle for mulled cider. It turns your BBQ station into a full outdoor kitchen.
Primordial Theater and Connection: There’s an undeniable, primal appeal to cooking over an open fire on a suspended pot. It becomes the visual and social centerpiece of the gathering, connecting us to centuries of cooking tradition and creating a memorable experience.
Why a Tripod for BBQ Still Beats Every Other Campfire Cooking Method
Fixed-height grates, rock arrangements, log cranes and direct ground placement all have one fatal flaw: poor or no vertical heat adjustment. Fire temperature drops roughly with the inverse square of distance — moving a pot just 4–8 inches higher or lower can change cooking power by 30–70 %.
A tripod for BBQ with adjustable suspension solves this instantly:
- lower position → direct high-heat searing / rapid boiling (500–700 °F zone)
- mid position → steady simmering / braising (300–400 °F zone)
- high position → gentle warming / keeping food hot without overcooking
- fully raised → remove pot completely while tending fire
No other simple system offers this level of control without constantly rebuilding the fire or moving coals. Add cast iron cookware from chinacastiron.com and you gain massive thermal mass that smooths out temperature swings even further.
Historical Roots: From Frontier Campfires to Modern Backyard Fire Pits
The three-legged cooking tripod predates written history — notched wooden versions appear in Neolithic sites across Europe and Asia. Iron tripods became widespread in medieval Europe for hearth cooking and traveled to the Americas with early colonists.
By the 19th century the design was perfected for frontier life: chuck-wagon cooks, cattle drives, logging camps, gold-rush settlements and military field kitchens all used tripod for BBQ setups to feed large groups reliably with whatever wood was available. The cast iron Dutch oven with legs + flanged lid completed the system.
Scouting movements (early 1900s) codified the tripod as core campcraft equipment. Today lightweight aluminum and steel versions coexist with traditional heavy forged-iron models, but the core advantage — infinite vertical heat adjustment — remains identical.

The Indispensable Synergy: Tripod + Cast Iron
This partnership is where the tripod for BBQ moves from interesting accessory to essential cooking system.
Why Cast Iron is the Non-Negotiable Partner:
Master of Radiant Heat: Open-fire cooking on a tripod relies heavily on radiant heat. Cast iron’s incredible density absorbs this radiant energy like a battery and releases it steadily and evenly into the food, preventing scorching and ensuring deep, slow cooking.
Fuel Efficiency: Once a cast iron pot is hot, it stays hot. You can raise it high above the fire to simmer, using far less fuel than maintaining a roaring blaze, as the iron’s retained heat does the work.
Unmatched Durability for a Harsh Environment: It laughs at direct flame, sparks, and soot. A quality preseasoned piece from https://chinacastiron.com/ can go from a gourmet kitchen to a roaring beach bonfire without complaint.
Versatility for Complex Menus: Use the tripod to sear meat directly in the Dutch oven over high heat, then raise it to braise. Or, bake bread by placing coals on the Dutch oven lid while it hangs. The tripod enables every cast iron cooking technique.
Mastery of Fire and Height – The Core Techniques
Using a tripod for BBQ is an active, engaging form of cooking that rewards skill.
1. Setting Up for Success:
Site Selection: Choose level ground. Position the tripod so the hanging point is centered over your intended fire spot.
Building the Right Fire: Start with a robust fire to create a substantial bed of hot coals. For most tripod cooking, you want a bed of embers, not towering flames.
Secure the Suspension: Before loading your cast iron cookware, ensure all hooks, chains, and ratchets are secure. Test the mechanism.
2. The Art of Height Adjustment:
The Boil Zone (Low Hang): For boiling water or potatoes, lower the pot to within 4-6 inches of the coals for intense conductive heat.
The Simmer Zone (High Hang): For stews, chili, or braises, raise the pot 12-18 inches above the coals. Here, gentle radiant heat works its magic slowly.
The Swing-Off: Use the swivel to move the pot completely off the heat to stop cooking instantly or to keep food warm at the edge of the fire.
3. Advanced Technique: The Two-Tripod System
For elaborate outdoor cooking, use two tripods: one suspending a Dutch oven for the main dish, another holding a grill grate for vegetables or a kettle for side dishes. This creates a professional outdoor kitchen flow.
Choosing Your Tripod – A Guide for Every Griller
For the Backyard Entertainer & Tailgater:
Priority: Stability, style, and ease of use.
Look For: Heavy-duty steel construction, a ratcheting suspension system, and a height of 5-6 feet. Aesthetically finished legs (e.g., black powder coat) are a plus.
Why Cast Iron? Essential for impressive one-pot meals that can feed a crowd.
For the Camping & Overlanding Enthusiast:
Priority: Portability, durability, and adaptability.
Look For: Stainless steel or folding steel designs, adjustable legs for uneven ground, and a system that packs down compactly.
Why Cast Iron? The perfect durable partner for creating gourmet meals at basecamp. A combo cooker from https://chinacastiron.com/ is ideal.
For the Bushcraft & Traditional Skills Practitioner:
Priority: Authenticity, self-reliance, and minimalist design.
Look For: A simple, sturdy design or the knowledge to lash your own from hardwood poles.
Why Cast Iron? The historic companion to this method of cooking.
Key Purchase Considerations:
Weight Capacity: Must exceed the weight of your largest pot when full (aim for 50+ lbs capacity).
Suspension Mechanism: Ratchet vs. chain. Invest in a ratchet for heavy cast iron.
Leg Stability: How do they lock? Are feet adjustable?
Material and Finish: Will it live outdoors? Stainless steel is low-maintenance.
Recipes That Define Tripod Cooking
Breakfast Category
- Mountain-man skillet breakfast (potatoes, sausage, onions, eggs, cheese)
- Dutch-oven cinnamon rolls (no-yeast quick version)
- Campfire blueberry grunt
Main Dish Category
- Beef & vegetable stew (classic low & slow)
- Chicken cacciatore
- Charcoal-braised short ribs
- New England clam boil
- Low-country shrimp & sausage boil
Bread & Side Category
- Trail cornbread
- Charcoal-baked beans
- Campfire garlic bread in Dutch oven
Dessert Category
- Peach cobbler
- Apple crisp
- Pineapple upside-down cake
Every one of these dishes benefits dramatically from the infinite height adjustment a good tripod for BBQ provides.
Companion Cookware – Why Cast Iron Is the Natural Partner
Almost every serious tripod user hangs cast iron. Reasons:
- massive thermal mass → very stable temperatures even when coals fluctuate
- excellent heat retention → food stays hot long after fire dies down
- natural non-stick when properly seasoned
- ability to stack coals on lid for true oven baking
Popular pieces include:
- 6–12 qt camp Dutch ovens with legs & flanged lid
- deep 3–5 qt kettles with bale handle
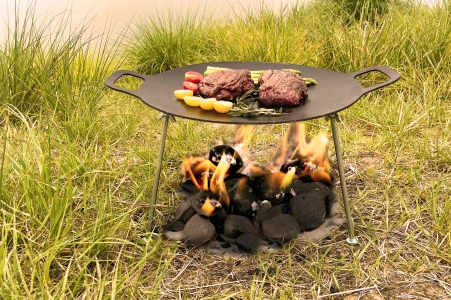
- large flat griddles with bail or chain attachment points
- reversible grill/griddle plates
You can find a wide selection of pre-seasoned, camp-ready cast iron pieces perfectly matched to tripod use at chinacastiron.com.
Safety Essentials for Tripod Cooking
- Stable ground — never loose soil or slope
- Wide leg spread > pot diameter
- Chain limit — pot never below tripod apex plane
- Weight rating respect (usually 50–150 lb)
- Wind shield — logs, rocks or foil reflector
- CO awareness — never use in fully enclosed tent
- Gloves & lid lifter mandatory — chain & hook reach 400–600 °F
- Fire extinguisher / water bucket nearby
A properly used tripod for BBQ is one of the safest ways to cook over open flames.
Maintenance & Storage for Long-Term Reliability
- After each trip: brush off soot, wipe chain with light oil
- Season end: clean thoroughly, apply thin high-temp oil to bare metal
- Store hanging or standing (never laid flat on damp ground)
- Inspect welds / chain links / hooks annually
A little care makes a good tripod last decades.
Final Thoughts — Why the Tripod Endures
In an age of pellet grills, induction burners and sous-vide circulators, the three-legged tripod for BBQ remains popular because it is brutally simple, extremely effective, and deeply satisfying. There is something primal and meditative about watching coals glow, adjusting chain length by a few links, and hearing the gentle bubble of a stew or the sizzle of bacon at exactly the right height above the fire.
Pair a solid tripod with a few well-seasoned cast iron pieces from chinacastiron.com and you’ll be ready to create memorable meals under the open sky for decades to come.