The Tripod Dutch Oven: The Ultimate Centerpiece for Primitive Gourmet and Open-Fire Feasts
There is a scene etched into the collective memory of outdoor enthusiasts and history buffs alike: a cast iron pot, suspended by a chain over a crackling fire, steaming and bubbling, promising a hearty meal after a long day. This iconic image is powered by one of the most effective and timeless outdoor cooking combinations ever devised: the Tripod Dutch Oven.
More than just a pot and a stand, the Tripod Dutch Oven is a complete cooking system, a symbol of self-reliance, and a portal to a more immersive and satisfying way of cooking and eating in the great outdoors. It represents the perfect marriage of durable, heat-retentive cookware and the adjustable, stable support needed to master the unpredictable heat of an open flame.
This comprehensive guide will delve into the world of the Tripod Dutch Oven. We will explore its rich history, understand the mechanics of how it works, guide you in choosing the perfect set, and master the techniques that will transform you from a novice camper into a revered campfire chef.
What Is a Tripod Dutch Oven?
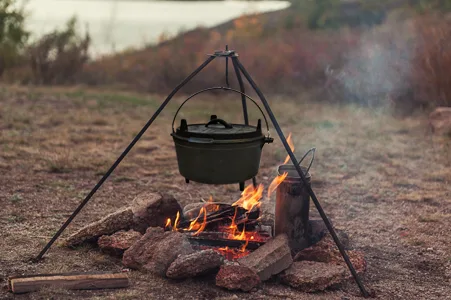
A Tripod Dutch oven refers to a Dutch oven used in combination with a metal tripod stand, which suspends the pot over a fire. The setup typically includes:
A sturdy steel tripod frame
An adjustable hanging chain
A cast iron Dutch oven (with lid)
Anchor points at the top for stability
Heat-resistant hooks for pot adjustment
This design creates a natural and efficient heat distribution system. When the pot hangs above the flame rather than sitting directly in it, you gain smoother, more controlled cooking—ideal for slow-cook recipes.
The most popular pairing is a cast iron Dutch oven due to its excellent heat retention. Many brands produce this setup, but for customizable OEM/ODM manufacturing options, https://chinacastiron.com/ offers professional-grade cast iron Dutch ovens and tripods suitable for camping retailers and distributors.
Why Outdoor Enthusiasts Love the Tripod Dutch Oven
3.1 Versatility Across Cooking Styles
The Tripod Dutch oven allows multiple cooking techniques:
Slow simmering
Boiling
Frying
Baking
Braising
Steaming
Roasting
Whether you’re making cowboy beans, venison stew, sourdough bread, or boiled vegetables, this system handles it all.
3.2 Perfect Heat Regulation
By adjusting the chain, you control:
Temperature
Cooking time
Flame exposure
Lowering the pot increases intensity; raising it reduces heat. This flexibility is a big reason bushcraft experts prefer a tripod setup.
3.3 Authentic Outdoor Experience
Many campers choose the Tripod Dutch oven because it connects them with traditional open-fire cooking—something gas stoves or modern equipment simply can’t replicate.
3.4 Works With Any Fire Source
You can use a Tripod Dutch oven above:
Wood campfires
Charcoal
Fire pits
Portable outdoor stoves
3.5 Extremely Durable
Cast iron cookware and steel tripods can last decades or even generations. Many OEM brands at https://chinacastiron.com/ offer heavy-duty cast iron Dutch ovens ideal for long-term outdoor use.

Why the Tripod Dutch Oven Combo is Unbeatable
In an era of lightweight, high-tech camping stoves, why does this seemingly primitive system remain so relevant and beloved?
1. Unparalleled Heat Control:
This is the system’s greatest advantage. The chain or hook mechanism on a tripod for Dutch oven cooking allows for precise height adjustment. Need to sear meat? Lower the pot close to the bed of hot coals. Simmering a stew all afternoon? Raise it higher. This level of control is impossible to achieve with a Dutch oven simply resting on rocks or embers.
2. Superior Stability and Safety:
A heavy Dutch oven full of food is a tipping hazard on an unstable rock setup. A quality cooking tripod provides a secure, three-point foundation that stands firm on most terrain. It also keeps the dangerous task of moving a scalding-hot pot to a minimum; you can often swing the entire assembly off the heat using a swivel mechanism, rather than lifting it.
3. Maximizing Cast Iron’s Potential:
Cast iron excels at even heating and retention. Suspending it over a fire allows heat to envelop the entire pot, creating a perfect oven-like environment. The Tripod Dutch Oven setup is ideal for recipes that require consistent, all-around heat, such as baking bread, braising meats, or slow-cooking soups.
4. The Social and Experiential Centerpiece:
A Tripod Dutch Oven over a fire is more than a cooking method; it’s a performance. It becomes the undeniable focal point of any campsite or backyard gathering. It draws people in, sparks conversation, and creates an atmosphere of anticipation and community. The process of tending the fire, adjusting the height, and finally unveiling the meal is a ritual that fosters deep connection.
Structure and Design of a Tripod Dutch Oven System
A well-engineered tripod setup contains several key elements:
4.1 The Tripod Frame
Made of steel or iron, typically foldable and portable.
Height varies from 90–160 cm depending on usage.
4.2 Adjustable Hanging Chain
Allows fine temperature control.
Some systems include multi-level hooks for quick height switching.
4.3 Cast Iron Dutch Oven
The heart of the system:
Thick walls
Tight-fitting lid
Loop handle for suspension
Optional feet for ground cooking
For high-quality OEM cast iron Dutch ovens with customizable branding, https://chinacastiron.com/ is a strong sourcing resource.
4.4 Lid with Lip (Suitable for Charcoal)
The flat lid with raised edges allows charcoal placement on top—ideal for baking and roasting.
4.5 Stability Features
Premium tripod sets include:
Non-slip leg caps
Heat-resistant top rings
Reinforced connection points
These ensure stability, especially on uneven terrain.
How to Use a Tripod Dutch Oven Like a Professional
Step 1: Set Up the Tripod
Choose flat ground.
Extend legs evenly.
Ensure top ring is secure.
Attach chain and hook.
Step 2: Start the Fire
Use dry wood, hardwood logs, or charcoal.
Avoid treated or chemical wood.
Step 3: Hang the Dutch Oven
Make sure the pot is centered for even heating.
Step 4: Adjust Heat
Lower the pot → more heat
Raise the pot → less heat
This allows slow cooking or fast boiling as needed.
Step 5: Rotate the Pot
This avoids hot spots and ensures food cooks uniformly.
Step 6: Monitor Moisture & Pressure
Tripod Dutch ovens hold moisture well—open the lid occasionally to release steam if needed.
Cooking Techniques With a Tripod Dutch Oven
6.1 Slow Cooking
Ideal for stews, soups, beans, and curries.
6.2 Baking
You can bake:
Bread
Biscuits
Cobbler
Pies
Cornbread
Charcoal on top helps create an oven-like environment.
6.3 Frying
Raise the oven slightly to avoid burning oil.
6.4 Roasting & Braising
The Dutch oven locks in juices and flavor.
6.5 Steaming
Insert a metal rack into the pot to steam dumplings, vegetables, or fish.
Care and Maintenance for a Lifetime of Service
This system is built to last generations, but only with proper care.
Cleaning the Dutch Oven: After use, while the pot is still warm, add a little water and use a wooden or plastic scraper to loosen food. Avoid soap, as it can strip the seasoning. Dry thoroughly over residual heat and apply a thin coat of oil.
Cleaning the Tripod: Once cool, brush off any ash and soot. For carbon steel tripods, a light wipe with an oiled cloth will prevent rust. Stainless steel can be wiped down with a damp cloth.
Storage: Store both the Dutch oven and the tripod in a clean, dry place. Ensure the Dutch oven lid is slightly ajar to allow air circulation.
Maintenance & Seasoning
9.1 Before First Use
Wash the Dutch oven, dry completely, then season with oil.
9.2 Cleaning
Avoid soap
Use hot water
Use a chainmail scrubber
Dry immediately
9.3 Re-seasoning
Apply oil and heat over the fire or oven to build a protective layer.
9.4 Tripod Care
Wipe down steel poles to prevent rust.
Store in a dry place.
Common Mistakes to Avoid
Hanging the pot too close to flames → burns food
Not seasoning cast iron
Leaving water in the pot
Using the tripod on unstable ground
Cooking acidic foods for too long before seasoning builds up
Safety Tips for Using a Tripod Dutch Oven
Wear heat-resistant gloves
Keep kids away from the fire
Ensure tripod legs are stable
Hang the pot securely on the hook
Avoid sudden chain adjustments
Keep a bucket of water/sand nearby
Conclusion: Reclaiming the Culinary Campfire
The Tripod Dutch Oven is more than the sum of its parts. It is an invitation to engage with our culinary heritage, to slow down, and to find profound satisfaction in creating something beautiful and delicious from the most basic elements: fire, iron, and food.
It challenges the notion that camping food must be simplistic, opening up a world of gourmet possibilities under the open sky. In a world of digital distractions and instant gratification, the slow, mindful process of Dutch oven tripod cooking offers a deeply rewarding return to rhythm, ritual, and real-world connection.
So, assemble your Tripod Dutch Oven kit, gather your friends and family, and light a fire. You’re not just preparing a meal; you’re creating an experience, a memory, and a legacy, one perfect, slow-cooked bite at a time.